| |
-
-
-
-
-
-
-
-
-
Hello All:
Thanks to all for your kind comments. I'm so glad that all you experts liked my work. That helps to make it all worthwhile.
I have been keeping sane distracting myself by making several cool G-Scale funicular railway videos including the very first known ONBOARD video of a model funicular!
We’ve really tried to do a good job of filming using the GoPro camera and special lighting effects.
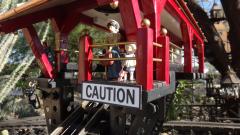
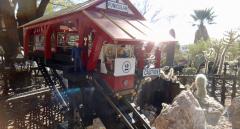
Here is a photo of the little funicular movie camera car that we used for the onboard shots. Note the cable hook and flange-less wheel.
What you can't see are the 453 grams of lead weights underneath the car! The total weight of the camera car exactly equals the 753 gram weight of the passenger cars. (for cable weight balance)
We published all the funicular videos in SD in a playlist on You Tube located here:
https://www.youtube.com/playlist?list=PLyH9sx8JUvHe7GRSgiqXcP0do_pSY6q6_
We had a good time making these and hope you enjoy them.
John
p.s. If you listen carefully to the audio of some of them, you can hear the same groans and creaking noises that real funiculars make. I love that!
p.p.s. Here are the higher resolution HD funicular videos on Flickr:
https://www.flickr.com/photos/jlcarmichael/49701403647/in/datetaken/
https://www.flickr.com/photos/jlcarmichael/49701102786/in/datetaken/
https://www.flickr.com/photos/jlcarmichael/49700547988/in/datetaken/
https://www.flickr.com/photos/jlcarmichael/49702443997/in/datetaken/
https://www.flickr.com/photos/jlcarmichael/49700553238/in/datetaken/
https://www.flickr.com/photos/jlcarmichael/49701418512/in/datetaken/
-
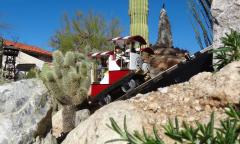
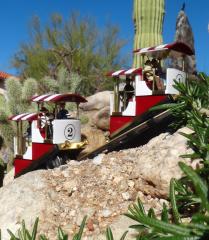
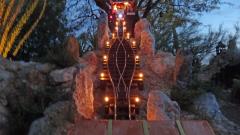
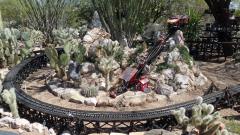
Yesterday, after 10 months, I finished installing the funicular outside within the Cholla Patch Railroad layout. It now has a new mountain range to climb. Most of the iron support structure is buried within the mountain. The entire mountain (except around the plants) is coated in a 2:1 water/Titebond III solution which solidified all the small particle sand and clay. This controls erosion and makes cleaning the leaves off easy with a leaf blower without all the sand blowing away. I use the same Titebond solution on my track ballast- like the HO guys do. I've designed and built a passenger boarding area with lots of anxious travelers and an ornate Victorian ticket booth (modeled after the precious upper tramway station booth at Saltburn Cliff Tramway in England- saltburn cliff tramway - Bing images ). This summer, I'll make a suspension footbridge from the upper station over to the Treehouse behind the mountain.
You can see photos of the installation details here: G-Scale Funicular Garden Railway
p.s. After Tucson's annual Rail's in the Garden home tour next weekend, I hope to make a more "professional" video with a tripod this time.
-
I'd like to add to my lists of Funicular Suppliers and Funicular Tips, but the "Edit" button has disappeared from the posts even though I am signed in. Is this happening to everybody's posts or just mine I wonder?
-
G-Scale Funicular Modeling Tips Here are a few things that are important to know when designing a functional model funicular that’s driven by a motor. See separate list of Parts Suppliers. Consult design drawings to see where the parts go. Power Source Selection: Use a 12V DC constant power source made for outdoor use. This voltage is more than adequate for the slow moving cable system, controller, sound module, and lights. It stresses the light bulbs less than a 24V source. A 35 watts output is more than enough. Motor Selection: Use a small high torque 12V DC motor with integral gears. 60 rpm works great. If motor has integral gears then you will be able to use fewer reduction gears for a simpler system. Only use motors that can be securely attached to a motor mount of the correct size. Gear Selection: To reduce friction, jamming, excess noise, over-complication, and headaches, use the fewest number of gears that will give you your desired gear ratio. With my system, only two gears are needed! Use only Metal Gears. Meccano Gears are the BEST! Keep gears greased and oiled. Pulley Selection: There are two types of uses for funicular pulleys: 1) The big Drive Pulley (also called “drive wheel”) moves the cable. You want to maximize friction between the cable and Drive Pulley so that the cable won’t slip which causes jerky movement or no movement. It should have a “V” groove and be as large as possible (3” diameter is good). The cable should be in contact with the pulley along as much of its circumference as possible to maximize friction. To do this use two directional pulleys close together and close to the drive pulley. I call these two “pincher pulleys”. Use the Meccano 19b pulley. Don’t use plastic pulleys. 2) Directional Pulleys change the direction of the cable. You want to minimize the friction of the cable against directional pulleys. To do this, avoid large angle changes to the cable when you design your system. Pulleys with ball bearings have less friction on the pulley axle. Don’t try to minimize cable friction by using light weight cars! Model funiculars work much better with heavy cars of equal weight because they add friction between the cable and the Drive Pulley. Don’t use plastic pulleys. Car Wheel Selection: Use the biggest and heaviest steel wheelsets you can find. Don’t use plastic. This helps keep a low center of gravity in the cars. Grind off the flange on one side of each set. Epoxy a ½” steel fender washer to the other wheel of each set to create a double flanged wheel. Remember, heavy cars are a good thing!
I'll add to this list as I think of other things..
-
I'm just curious Ray, what was the most challenging part of the conversion?
-
Congratulations Ray-Excellent sound and smoke. Bet your wife thought the house was on fire!
-
G-Scale Funicular Parts Suppliers
This is a partial list of the most important parts used in the construction of the G-Scale Funicular by John Carmichael. I recommend using these parts for ANY type of G-Scale funicular. J.C.
Circuitron 5401 AR-2 Auto Reverse Circuit with Adjustable Delay- $49.99 requires a 12-18 volt AC or DC power supply. Will work with a reed switch for detection rather than IR detector.
https://www.traintekllc.com/circuitron-5401-ar-2-auto-reverse-circuit-with-adjustable-delay/
http://www.circuitron.com/index_files/ins/800-5401ins.pdf
Nextrox Mini 12V DC 60 RPM High Torque Gear Box Electric Motor- $11.99 60 RPM |Torque: 30 N*cm |Diameter: 37mm |Shaft length: 21mm |Total length: 68mm. All Metal Construction. 100% metal gears, designed with high temperature-resistance, high abrasion resistance, more sturdy and durable.
Diameter: 37mm
Length [excluding shaft]: 47mm
Shaft length: 21mm
Total length: 68mm
Shaft diameter: 6mm
Weight: 138g
https://www.amazon.com/gp/product/B00BX54O8A/ref=ppx_yo_dt_b_asin_title_o01_s00?ie=UTF8&psc=1
uxcell GA/GB 37mm diameter DC Geared Motor Mounting Bracket Holder- $7.80 + 6mm Hex Coupling. https://www.amazon.com/uxcell-diameter-Mounting-Bracket-Coupling/dp/B00TK0X03U/ref=pd_sbs_328_2/140-6459772-3863408?_encoding=UTF8&pd_rd_i=B00TK0X03U&pd_rd_r=320e17da-87dc-11e9-9e76-bd9072b5bc3a&pd_rd_w=Yz3aL&pd_rd_wg=WrmA3&pf_rd_p=588939de-d3f8-42f1-a3d8-d556eae5797d&pf_rd_r=1JM79NHY318RMT45ZTQ3&psc=1&refRID=1JM79NHY318RMT45ZTQ3
Meccano 30m Bevel Gear 12 Teeth- L7.80- Bevel Gear. 12 Teeth. ½" (13mm) Diameter. ½" (13mm) Long. Brass. Requires 1 Grub Screw (69a). Only meshes with 30n to give 3:1 ratio and 90 degree drive angle. Cable should move at 2.88 inches/second.
https://www.meccanospares.com/30m-BR-N.html
Meccano 30n Bevel Gear 36 Teeth- L20.50- Bevel Gear 36 Teeth. 13/16" (30mm) Diameter. 7/16" (11mm) Long. Brass. Requires 1 Grub Screw (69a). Only meshes with 30m to give 3:1 ratio and 90 degree drive angle. Cable should move at 2.88 inches/second.
https://www.meccanospares.com/30n-BR-N.html
Marine Grade T316 Stainless Steel Wire Rope Cable, 1/32", 7x7 with 25 PCS Sleeves,100 ft: $24.99
Minimum Pulley Diameter is 1.25”. Wire Thickness: 1/32” = .03125”= .79375mm
https://www.amazon.com/Marine-Grade-Stainless-Steel-Sleeves/dp/B07GRSTSRC/ref=sr_1_3?gclid=EAIaIQobChMI4crBu9zV4gIVFNNkCh0XIQLfEAAYAyAAEgLf1fD_BwE&hvadid=224125413760&hvdev=c&hvlocphy=2840&hvnetw=s&hvpos=1t3&hvqmt=e&hvrand=10687074805269477251&hvtargid=kwd-366694074420&hydadcr=20523_9561723&keywords=1%2F32+steel+cable&qid=1559854081&s=gateway&sr=8-3
Hard-to-Find Fastener 014973180973 Fender Washers, 1/4 x 1-1/2, Piece-10- $8.89 Use to modify standard wheel by adding a flange.https://www.amazon.com/gp/product/B00L1IYS6C/ref=ppx_yo_dt_b_asin_title_o01_s00?ie=UTF8&psc=1
Permatex 84109 PermaPoxy 4 Minute Multi-Metal Epoxy, 0.84 oz. - $3.17 Use to attach washer to steel wheel to make extra flange. https://www.amazon.com/gp/product/B000ALDXV2/ref=ppx_yo_dt_b_asin_title_o00_s00?ie=UTF8&psc=1
Bearing Steel V Grooved Wire Pulley Bearing Wheels Roller 5x22x5mm, 5 Pcs- $15.11 For pincher and redirection pulleys. Hole: 5mm=.1969”, Diameter: 22mm=.8661”, Thickness: 5mm=.1969”, V-groove width: 3mm= .1181”, V-groove deepness: 1.5mm= .0591”
https://www.amazon.com/Bearing-Groved-Pulley-Wheels-Roller/dp/B015J4UU7Y/ref=sr_1_13_sspa?keywords=flat+groove+steel+pulley&qid=1559583151&s=industrial&sr=1-13-spons&psc=1
Meccano Blue Pulley 19b 3" Diameter Original - Used Condition- Ebay- $5.26
https://www.ebay.com/itm/Meccano-Blue-Pulley-19b-3-Diameter-Original-Used-Condition/173838434987?hash=item28799402ab:g:l08AAOSw~SNbTLof
Make & Take Mini Flat Car Kit 2pcs. HLW15000- Reindeer Pass- $11.50 from Hartland locomotive works
http://www.reindeerpass.com/MAKE-TAKE-MINI-FLAT-CAR-KIT.aspx
uniquegoods 6V 12V 24V 28V 3A 80W DC Motor Speed Controller (PWM) Speed Adjustable Reversible Switch 1203BB DC Motor Driver Reversing- $8.45 "for 12v motor speed controller" Item size: 1.3 x 2 x 0.4 inches; Net Weight:1.13 ounces
Duty Cycle adjustable: 5%-100%, potentiometer with switch function. maximum output power: 80W, maximum continuous output current: 3Ahttps://www.amazon.com/gp/product/B00RYRXFW2/ref=ppx_yo_dt_b_asin_title_o01_s00?ie=UTF8&psc=1
1/4 inch to 6mm Stainless Steel Set Screw Shaft Coupler - $4.99 303 Stainless Steel . works great. https://www.amazon.com/gp/product/B00KVNA1IW/ref=ppx_yo_dt_b_asin_title_o00_s00?ie=UTF8&psc=1
Mean Well LPV-35-12 Power Supply / LED Driver 90-264 VAC Input 35W 3A 12V Output - $15.56 waterproof! https://www.amazon.com/LPV-35-12-Supply-Driver-90-264-Output/dp/B00IO1W38E/ref=sr_1_16?keywords=meanwell+waterproof+12v+power+supply&qid=1569615674&s=gateway&sr=8-16
-
I've moved the funicular outside to the garden railroad and footings are on the 10" deep large crushed gravel foundations. After the Thanksgiving storms, I'll start landscaping, install the buried electrical conduit, and build the ticket booth and stairs to the lower platform.
-
This the first full system test of my new Funicular Railway in Tucson Arizona. Please excuse the hand-held camera shake!
See video here: https://www.flickr.com/photos/jlcarmichael/49105795553/in/datetaken/ and here: https://youtu.be/SmoXgy7kNUo
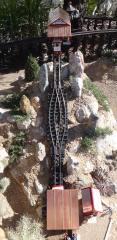
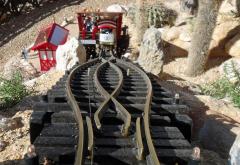
I moved it to my garden railway yesterday for permanent installation where I'll build a mountain around it. It features automated station stops, delay, and auto reverse- all programmable. Speed is adjustable if necessary. Also has an automatic warning bell, and extensive cabin and structural lighting. This is a rare two rail G-Scale Model Funicular with the ingenious and revolutionary ABT Passing switch. (the only railroad switch without moving parts! In fact, I know of no other G-Scale version in the United States.
See: https://www.giessbach.ch/en/abt-switch.html
And see this VERY interesting article: Giessbach Funicular.pdf (2.1 MiB)
Most of the people I talk to- even railroad aficionados, don't even know what a funicular is. This is understandable since very few exist in the United States. But there are some incredible ones in the rest of the world.
My funicular features automated station stops, delay, and reverse- all programmable. Speed is adjustable with a throttle. It also has an automatic warning bell just like the real ones, and extensive cabin and structural lighting. Controls are conveniently located outside of the rear of the Gear Room.Everything is weather resistant for outdoor use.
To make a fully functional G-Scale model I had to teach myself everything about it since there is almost no information on modeling a funicular on the internet or railroad magazines. Everything, including the crazy tracks, had to be designed by just using old photographs of real funiculars. I is the biggest railroading challenge I have ever met. Precision in all parts of the design and construction is imperative. The split-level cars must stop exactly in line with the boarding platforms. The cars had to travel at 3 inches/sec. And I had to teach myself all about gears and gear ratios and how to do the calculations knowing the motor's RPM. Difficult but lots of fun!
I’m making these full design drawings, electrical diagrams and construction photos available to everybody hoping that more will be built. This way, future modelers won’t suffer the learning pains and design errors I had to solve teaching myself how to make it, since funicular modeling information on the internet is almost nonexistant. See here: https://www.flickr.com/photos/jlcarmichael/albums/72157711889718966
Meanwhile here are some of my diagrams and drawings for a quick overview:
I'll also post another video after outside installation. I'd like to write an article for Garden Railways Magazine after final installation and landscaping is complete.
My Funicular was inspired in part by a G-Scale demonstration model of the Horseshoe Curve funicular that was made in Barcelona Spain. Although his model is a little “rough around the edges”, it proved to me that an ABT Passing Switch was possible on a G-Scale track. I took his idea and made several improvements. See: https://www.youtube.com/watch?v=TL0XYKtTEHw
My thanks go out to him and to Mr. Steve Worack, the man who designed and sold me the Circuitron AR-2 auto reverse & delay controller. His helpful connection advise was critical to the sucess of the project. It works perfectly. Thank you Steve.
If anybody has any questions, just ask. But please be patient as my reply may take time. I'm very busy trying to get thefunicular landscaping done before our Christmas party.
Thanks,
John
-
-
This is actually a test posting to see if I can post a video from my Flickr account. If this doesn't work, I'll try U Tube
It was taken last week and is of my Cholla Patch Railroad track filmed from my Go Pro camera car pushed by an eggliner.
https://www.flickr.com/photos/jlcarmichael/41837957681/in/datetaken/
-
-
This question might be one only Ray can answer.
I take MP4 videos of my railroad using a Go Pro camera. I always take them in high resolution (usually in the 500mb size range).
Is there a maximum size limit for posting videos on the Forum?
thanks in advance.
-
Hi Nick:
I think you're right about the crane for raising one end of the barge.
At 58 seconds into the above Hudson river video there is a very clear but quick overhead shot of the barge/dock rail union. You need to pause the video to have enough time to study a still photo. There are clearly no rail joiners at the rail unions just before the cars pass over.
The HO guys seem to have a lot more experience in building car floats than the large scale guys. (There are even model kits in Walther HO). On You Tube you can see lots of videos showing scratch and kit built ones. There also more videos of actual ones. Seems that most of the scratch built ones are made from plastic or styrofoam. See videos here: https://www.youtube.com/results?search_query=railroad+car+float
-
Nick:
I found this video/webpage that clearly shows the devices that align the barge with the rails. They are big steel pins that side forward from the dock and pass through hoops on the barge. It's a little hard to see clearly the place where the rails meet, but I don't think I see any rail joiners at all. But I do see wheel flange guiding rails on the inside of the main track rails on both the barge and the dock tracks. Since the barge rails must be at the same height as the dock rails guessing that the height of the barge can be adjusted by filling the barge hull with water (to lower) and pumping out water (to raise). see: https://untappedcities.com/2017/02/02/behind-the-scenes-at-the-floating-freight-rail-line-that-crosses-the-hudson-river-in-nyc/
-
Hey Nick:
Have you given any thought as to how the rails on the barge will connect to the rails on the dock? Wouldn't it have to be some sort of joiner that is temporary? I wonder if the real rail barges use something like a life size Split Jaw joiner? Do you know what they use?
Will you have it floating on real water?
sounds like a fun project.
-
Please excuse my ignorance, but to what are you referring Sean? Is the paint job on the Triplex incorrect?
|
|