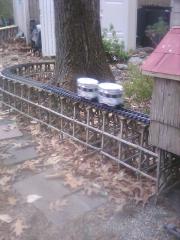
Post & Ladder Stringer Roadbeds - Construction Steps
From unpublished article by John Carmichael - Feb 2, 2019 - Tucson AZ
Suggested Step-by-Step Construction Instructions:
1) Prepare the Roadbed Site: Just clean up general debris and things you know you need to remove for the roadbed. It is not necessary to remove all the plants and rocks. I would avoid doing any major landscaping at this stage. Just rake the ground and remove rocks where you are pretty certain the route would go.
2) Determine the Routing Design of your Layout. You do not necessarily need to make a precise drawing of the layout using this method and you don’t need templates. Use garden hoses instead! (However if you want a site plan drawing of the railroad, try using this free layout design software. It’s easy and intuitive: https://www.scarm.info/index.php) Using the hose method is fun, so get the whole family involved. When it’s sunny and warm and the hose is flexible, lay a hose of known length (or several connected together) flat on the ground of the site following your general roadbed route avoiding special plants and other non-movable structures. Remove anything that’s in the way that you are willing to sacrifice. Play around with the routing until everybody is happy with the general design. The hose placement does not need to be exact, only approximate. But remember one of the cardinal rules of model railroads: Make the curves as wide as possible! You can measure radii exactly if needed with a center post and a tape measure or string or by comparing a section of factory track curves to the hose. Where tracks cross at different elevations, just let the top hose lie on top of the hose underneath. Don’t worry about elevations for now.
3) Determine the Linear Feet of Roadbed in the Design: Add up the total length of the hoses you used. Easy! This will give you a close estimate of the linear feet of roadbed you will need.
4) Calculate the Total Linear Feet of Lumber Required: Using my design drawings and measurements, calculate the total linear feet needed to make the HDPE flexible stringers (both sides of the ladder) and the composite brownies. Since everybody has different elevations, you will need to estimate the total footage of 2 X 2 composite stock needed for the elevation posts and add that to the stock needed for the brownies because you’ll make the posts and brownies out of the same stock. The average height of your railroad multiplied by the number of posts roughly equals the total footage of post stock. If you only need posts temporarily until you install trestles, then put the posts 6ft. apart. But if the posts will be permanent then place posts 2ft. apart. Add about 25% extra stock to all your calculations.
5) Locate Suppliers: Besides pricing and availability, try to find ones who will rip the stringers if needed and will deliver your order to you. The stringer lumber requires a very long flatbed truck! My supplier only charged me 75 dollars for the delivery. 8 to 12 ft. long composite stock is a convenient length to buy for the brownies and posts.
Find the longest lengths available of flexible HDPE or PVS for the stringers.
6) Purchase Supplies: Of course price is important, but as I told one member, I would use this method and these materials even if they were a little more expensive than others because there are so many extra benefits. Be sure to buy about 25% extra materials to cover Murphy’s law. You’ll be glad you did! Note that actual lumber sizes are often different from nominal sizes. Also, buy a couple boxes of 1 5/8” Deck Screws at Home Depot to get you started. I like the flat head Philips screws by Everbuilt which come in grey and brown, but color doesn’t really matter since you’ll be painting the final assembly.
7) Prepare your Shop or Garage for Pre-construction: You will need a place to cut wood accurately with a table saw or a cut-off saw fitted with large teeth blades to avoid overheating plastic. Avoid hand-held saws for more accurate cuts. You’ll need a sanding block or palm sander for rough edges. An electric screwdriver is essential to protect your hands from strain. And you’ll need several clamps. I love the Quik-Grip mini bar clams. Metal “C” clamps are good too, but require extra padding so they don’t damage the HDPE. You need a tape measure, a yardstick type ruler, a handheld electric drill and a long workbench or table to hold the 8 ft. long stringer jig template. A 9 or 10 foot bench would be best. If you don’t have a bench you could clamp the jig on top of two sawhorses. Make the brownie jig using the drawing (see jig drawing below).
8) Make the Brownies: One roadbed builder affectionately called the stringer spacer/joiners blocks “brownies”. That’s exactly what they look like, and that’s what I call them. When I made the “brownies” it was a real assembly line. I felt like Lucy Ball at the chocolate factory! I’d cut hundreds at a time filling up a couple of big buckets with them. The bench supported the 12 ft. long composite stock as I cut it down with my table saw at the end of the bench. Use a chop saw or table saw with blades with large teeth to avoid plastic melting. Use 1.5" x 1.5" actual size composite wood stock. Be careful with your cuts so that each brownie is exactly 2” long and the cuts are straight by using the saw’s sliding board guide. It’s easy to get sloppy when you make so many and are cutting them quickly. Avoid hand-held saws since they don’t cut as straight as a table or chop saw. Since there are two brownies per foot on the stringers, the total number of brownies needed is 2 times the total linear feet of roadbed. Example: If you have a 100 ft. roadbed, you’ll need about 200 brownies.
9) Partially Assemble the Stringers: During in-shop pre-construction, using the brownie jig, only attach one side of the “ladder” stringer to the brownies. First measure and mark the drill hole locations on a stringer board with a Sharpee pen. Then insert brownies into the jig notches and clamp one flexible stringer board to the front. If it has wood grain, make sure it’s on the outside. The hole mark should be exactly in front of the center of each brownie. While still clamped to the jig, drill pilot holes about 1 5/8” deep through the stringer and into the brownies. Make pilot holes smaller than the diameter of the deck screws. I used 1/8” drill bits. Since the HDPE is somewhat soft, you can tighten the screw way down so that the screw head is countersunk and flush with the surface of the stringer. It’s ugly if it sticks out. Remove the partially built stringer and brownie assembly from the jig, and place it back into the jig to finish attaching all the brownies along the entire length. Do not connect the other half of the stringer assembly until the on-site construction phase. Add up the number of butt joints you’ll need, then using the same 1.75” wide HDPE stringer material, cut 6” long lengths that will serve as the stringer butt end joiners. Add one joiner to one end only. Don’t add joiners at both ends! Remove partial stringer assembly and store it out of the way. Continue making and storing more partial stringer assemblies. The total length of the partially assembled stringers is equal to half of the total length of the entire roadbed. (See stringer drawing below).
Note: The roadbed for switches and multiple tracks must be made separately without a jig. (See switches and multiple track drawing below)
10) Begin On-Site Partial Stringer Assembly: Now it’s time to connect the ends of the partially assembled stringers (half of the ladder). This part is real fun! Drag two partially assembled stringers to the construction area (they are too floppy and unwieldy to carry.) Lie them end-to-end on the ground right next to your garden hose “template”. To connect the butt ends of the stringers together, use two 1 5/8" Deck Screws on each stringer placing them 1" and 2" from the ends of the stringers. Each butt joint requires 4 screws total. (See stringer drawing below) Pound rebar into ground next to the stringers to maintain the curves you want. You can also use bricks or rocks if you run out of rebar. Watch how the stringers magically pick the best curves with perfect transitions- even S-curves! All you need to do is find the biggest curves that fit in the available space while avoiding obstacles. Then repeat this over and over as you extend the partially assembled roadbed. Don’t worry about elevating them now. Just leave them on the ground. Where one partial roadbed passes over another, just let it temporarily rest on the stringer below it. We are only concerned with the shape of the route at the point.
11) Finish Stringer Ladder Assembly: After you are completely satisfied with the shape and you like the curves, it’s time to attach the opposite stringers of the ladder to the partially assembled stringers on the ground. Drag several stringers boards without brownies to the railroad site. When you attach the opposing stringer boards, the structure magically becomes very rigid! You cannot change the curve while both sides of the ladder are attached to the brownies. If you find you need to change the curve you can simply unscrew one side of the ladder to readjust. It's extremely important to stagger the placement of the stringer butt joints so that there is no joint on or near the opposite side of the ladder. This would weaken this section of roadbed and will cause crimping in a tight curve. Don’t put joints across from each other! Leave the fully assembled roadbed on the ground until the next step.
12) Install the Posts: The first posts you install should be spaced 6 feet apart. I advise against using ugly and weak PCV plumbing pipe. Although PVC pipe is less expensive, it is flexible and round so it doesn't attach flush to the flat surfaces of the stringers and brownies and it’s not UV protected. The 1.5" x 1.5" (actual) composite stock used for the brownies is ideal for sturdy posts that support the stringers at their proper elevation. Even if the stringers themselves will be buried under the ballast or are at ground level, short posts will help secure them. Before installation, I recommend screwing a 6” long piece of 1” x 6” composite decking board (like Trex) to the bottom of the posts especially if the posts will not be replaced by trestles. You can buy composite deck boards at Home Depot. Use 3” deck screws to attach the foundation boards to the posts. These will keep the posts stationary. Posts should be buried about 6 inches deep in mild climates like Tucson where there is no frost heave. Otherwise, they should be buried deeper. Place the posts through the gaps in the ladder between the brownies so that they are perfectly vertical. Don’t fill in the holes with dirt yet because you may need to adjust the post height later.
13) Elevate the Roadbed: Use clamps to temporarily attach stringer ladder to posts spaced 6 ft. apart. Using the clamps, raise the roadbed so that it has the proper slope and elevation. It’s handy to have some pieces of bricks and/or rebar and clamps available to temporarily help in raising the roadbed. As you raise it, make sure all posts stay vertical. If you have very high sections, you may have to gradually raise parts of the roadbed in stages by clamping, unclamping and re-clamping to its final height. Gradually raising the roadbed prevents excessive vertical stress on the plastic stringers. Check the elevation every six feet where every post is. My homemade Archimedes type clear ½” rubber hose water level was indispensable for elevation determination. I established a base point at the lowest elevation of the roadbed from which I could measure the elevation of any point on the roadbed using a clear 50 foot water-filled hose tied to rebar. After you raise the roadbed to its proper height, don’t allow any post to extend above the roadbed. Protruding posts need to be buried deeper, replaced, or cut off. When the elevations and slopes are absolutely correct, use 1 5/8" Deck Screws to attach the posts to stringers. Always pre-drill pilot holes in everything and make sure the screw goes through the stringer to the center of the brownie behind it. If you make a mistake, you can easily correct it by removing screws and re-screwing.
14) Add more Posts or Trestles: Now you need to strengthen the roadbed with more posts or trestles. The current 6 foot spacing too weak and far apart. Posts or trestles must be placed 2 feet apart or less. This spacing provides enough strength for the heaviest of trains. With posts every six feet, there is some stringer sagging between them which you’ll need to correct as you add more posts or trestles. Carpenters levels, long and short, are great for fine tuning the slope and finding dips. When the elevations and slopes are absolutely correct, use 1 5/8" Deck Screws to attach the posts to stringers. The roadbed is now fully assembled. Soak the ground around the posts with water to bond the soil to the post foundations. This will harden the soil around the post foundations after it dries. (Tucson soil is like cement when it dries!) If you plan on later replacing the posts with trestles, the leftover composite post material can be reused on the bottom horizontal part of the trestle bents that touches the ground (to avoid rot & termites). Give the roadbed a final inspection, tighten loose screws and fix abnormalities. Clean off all the mud and dirt with a good hose washing, but don’t spatter more mud on it with the hose. Let dry thoroughly.
15) Paint the Roadbed: When it’s passed inspection and is clean and dry, it is time to paint the ladder stringer roadbed assembly. The plastic ladder must be painted to further protect the plastic from the sun’s UV. Use three even coats of Krylon spray paint for plastics. It goes on best on a cool morning with no wind. I used one coat of primer followed by two coats of camouflage ultra-flat brown. It’s not necessary to paint the posts unless it’s for aesthetic reasons.
16) Install Rails and Ties: Note that the roadbed is exactly the same width as the ties so there is no overhang. Flex ties and Flex rails are the easiest to install and permit graduated and non-standard curves. You can use a rail bender on a nearby work table to get an approximate curve on a piece of track. Then you can put the track section on the roadbed and use the rail bender again to get the exact curve. Bending the rails is easy once you get the hang of it. It only took me a week to bend and install all my track (380 ft.). Attach ties to the top of ladder stringers using 1” # 6 pan head stainless steel screws. Drill 1/16” pilot holes through ties into the stringers. Screw ties to top of 3/4" stringers about every 18 inches using thin 1” long stainless steel sheet metal screws with a round head. I used Split-Jaw rail joiners almost everywhere with great success.
17) DONE! Now you can test the track and run your trains.
By
John Carmichael ·