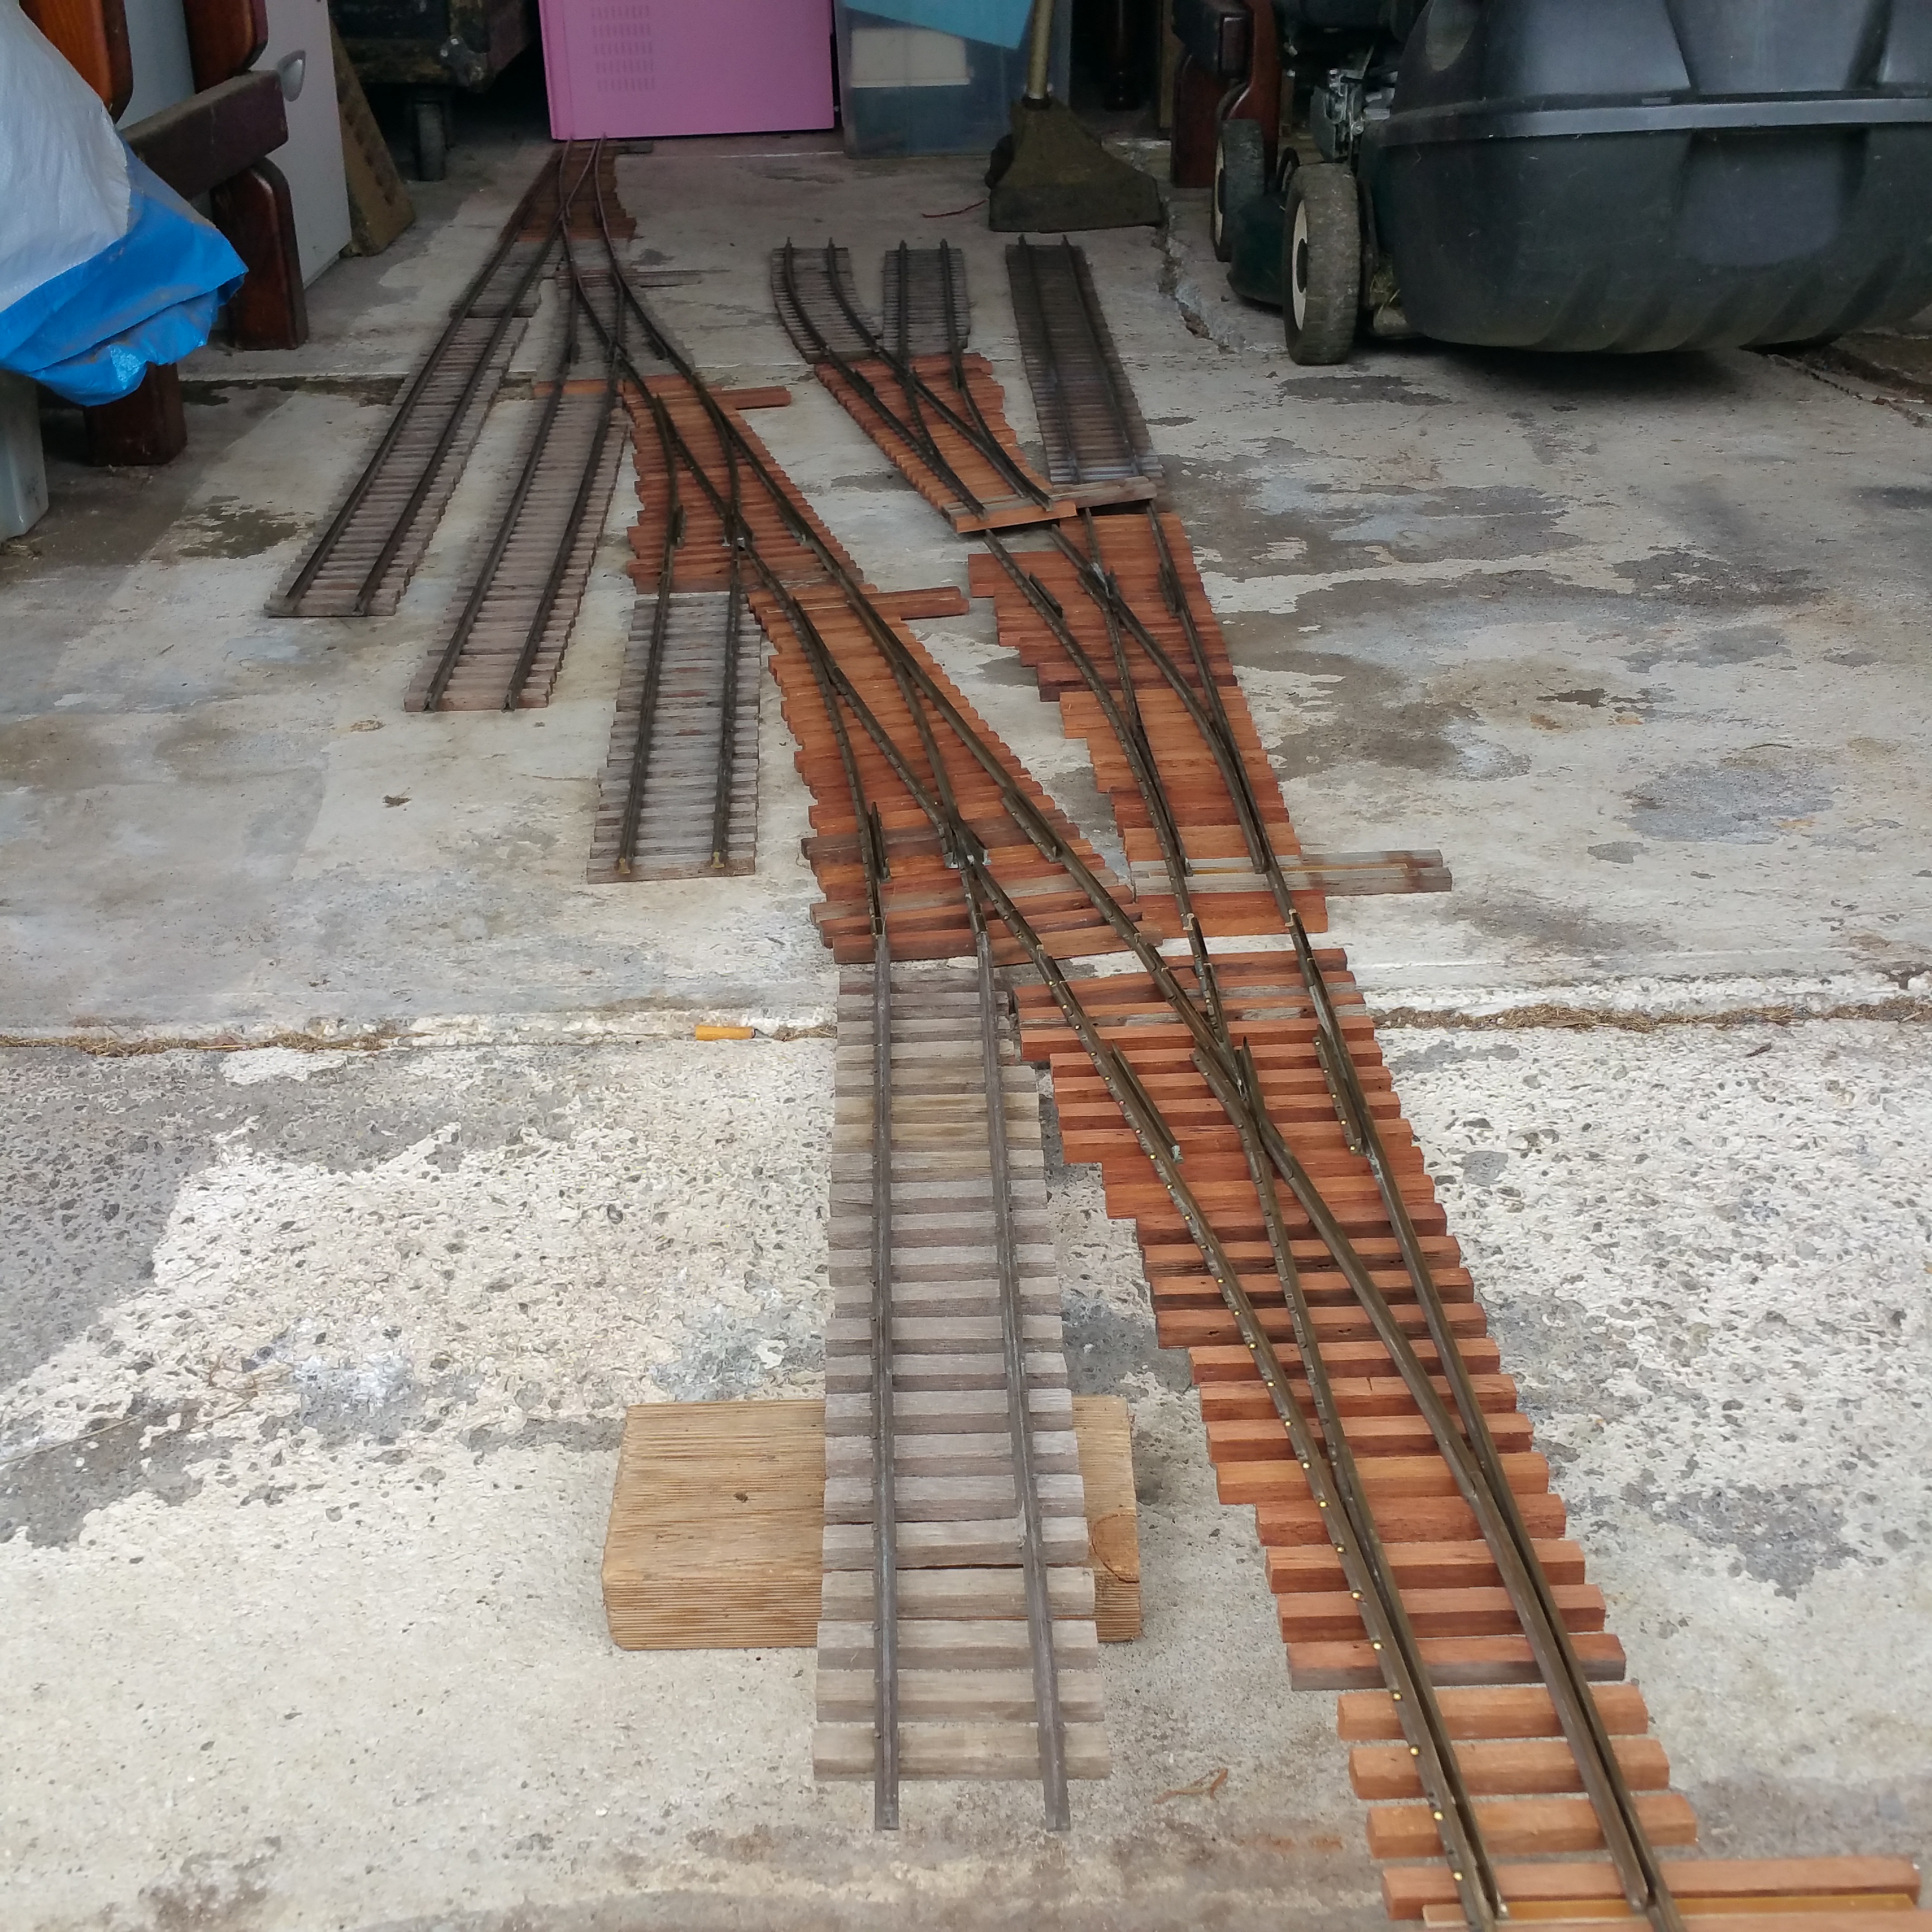
Thank you Chuck. Interesting that you picked up on the wye, So here is how it goes. A #10 of the main into a #5 wye, This brings the second track parallel with the main and the added effect of bringing the #6 units into play of the other angle. Track centre's are 7" from the main to track 2 and then 5 1/4 inches on all the rest of the tracks. The holding tracks are #7 turnouts that had been made for a client a couple of years ago (2 L/H and 2 R/H) who did not show up, I have been looking at them for ages wondering where I could use them and this is it. They are also 5 1/4" spacing. Total track bed width is 40 1/4 inches on the base, Quite workable. As to length, well the side of the house we never use has a garden bed in it with a concrete walkway between it and the house. SWMBO has okayed the use of this for this project then it is going to be a LOT of honey do's for the rest of the layout. (Can read that one like a book! ) Like Joe's layout it will run the boundries so should be ok. I hope.
Don't know if you get this Stateside for decking , probably the best sealer on the market here is Cabot's Stain. And you PAY thru the nose for it too. I do not seal my ties, period. As in ever!
In Oz the predominate timber used in real Railroad ties / sleepers is Redgum. Hard as rock, lasts a long time, and weathers to a grey colour over time. I have wrecked a Carbide tipped 32 tooth bench saw blade cutting this stuff into lengths. That is why very early on I opted to Mirbou. As you found it is dense but does rip easier than some other hard woods and if you use a blade as such as I mentioned then you will not need to dress it as it cuts clean. I buy it in linear feet and get the supplier to run it thru a thickness machine to get the desired width of the tie and then rip it at home to give me the thickness. Cuts down on cost and also I get what I want. Then I cut the resultant lengths up into what ever length tie I want.
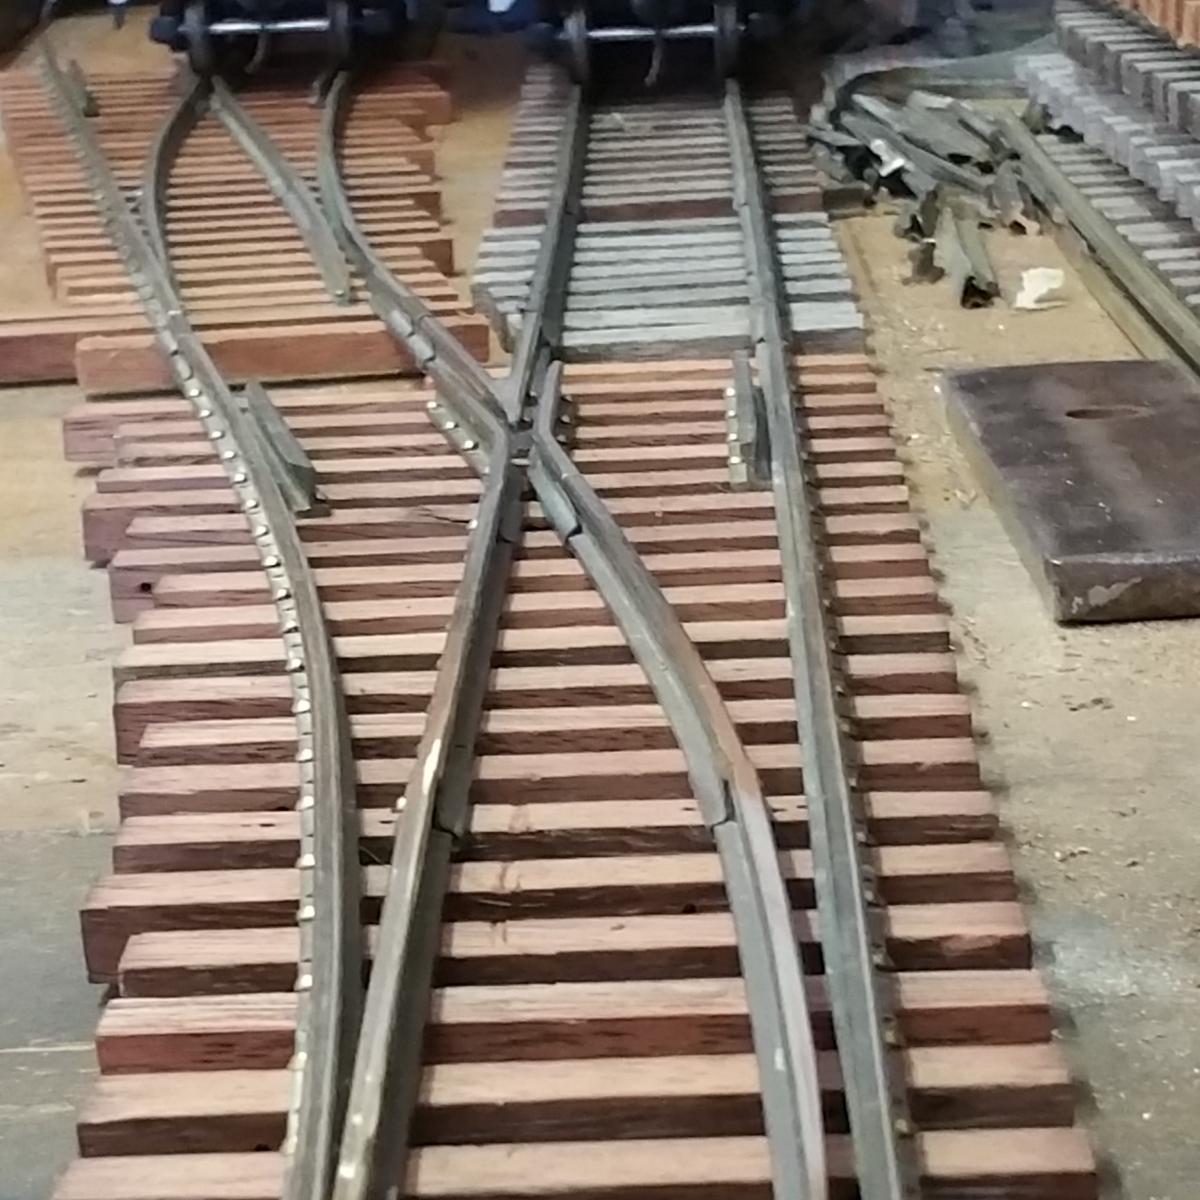
I repeat to you again that the way I spike my rail is NOT the purist's way of doing it. What Jerry described is in essence the correct way for what is achieved, but a purist would take it maybe 2 steps more and use tie plates and spike one in the tie plate and one diagonally opposite on the same rail. Then count the rivets.
If you look closely at this picture you will see how it is done. I drill thru the foot of the rail after marking it with a fine marker at the tie spacing , on one side only and relay the rail on the tie and use a smaller drill to make a pilot hole right thru the tie. I don't mind telling you that what I use for spikes are serrated brass Escutcheon pins. Should be available in the States. I strongly suggest that if you try this, only do it on one side of the rail. If you do both sides you WILL bow the rail! Ask me how I know, hehe. I might add here for your benefit that I own Outback Turnouts. The wood I use is a hard wood used here for decking and is called Mirbou. Pronounced Mer- boo. Some of the gray ones in this photo are nearly 20 odd years old and have been in all sorts of weather and still good as new. And white ants hate it. A GENTLE tap with a Brad hammer and a scollop headed nail punch until seated is all that is needed. Do get yourself some good quality track gauges or make them yourself if you wish. I make my own and my main one is made from tool steel and is in this photo, all-though it is upside down. It is for straight track and is accurate to a couple of thou. Also make yourself a tie jig. A long one. Finally, I see no reason why you cannot use the rail you have because it is the same as what I use, I just buy it in bulk, (Half ton loads, just not from LGB) Hope I have been of some help here with this for you. I might also add that how I do it is not for the purist but then I do it this way for longevity and strength. Last thing I want is for me to be running around re-spiking track before a session.
Had a bit of a rethink on this and have altered the main track spacing from 6" to 8" centre to centre. ( I know, I know, Muricans spell it center.) The rest of the yard is all 6" centre's. The reason is because if someone should turn up with a 1:20.3 loco then it will clear in passing through. Make sense? Thank you for the input Joe. Always appreciated and I did read that book Modelling for Operations. Lot of good stuff in there if you was modelling in HO but in 1:32 scale it gets real big real quick! Still some of the ideas in the book can be bent to fit.
The track to the far left is the main. Tracks running the other way could be yard pocket , engine storage , whatever. Any one see anything wrong with this? I am into operations and just to make sure the other end is a mirror image but without the pocket, or do you think a pocket would be a good thing as well. Just throwing this out there for comment.
Above are a some of the oldest and earliest turnouts I have ever made. Some are nearly 20 odd years old. Time for a rebuild. What you see here are #7, #8 and #10 turnouts.
These are #6 turnouts and over in the back corner is a #4 and the very first turnout I ever made a double curved turnout made to a LGB 1800 radius.
Various wyes from a #3 thru to #5 units.
Number #10 units used as a crossover and the same crossover with a Challenger sitting on them. Sort of gives you an idea how much room you need for that, but looks good
The reason I am showing this is because I uploaded these photos to a album and lo and behold they appear at the top bar in the opening page of the forum. So I felt an explanation was necessary to the members. All of these turnouts that you see have been upgraded, mainly with new ties, and rechecked to the G1MRA standard. Hope this explains why those photo's are there and the next question obviously is, how do I stop that from occurring again when I upload photo's to my album?
I would say , Mike , that the reason MTH does not "do" Euro outline is because that market is very very well served already with the like's of Brawa, Piko Marklin/LGB and such others which are already serving that market. Plus some of these companies make models at a astounding detail level that to compete, MTH would have to at least equal that level and also at a price point to match as well. This would also include shipping to the said market and then making a profit to meet MTH's levels of margin, or expectation at least. Shipping is a killer for any one international and is my main motivation behind what I buy / do not buy. To go to an extreme, I would like to purchase a magazine that was printed in 1958. I could buy it for $2 USD and the shipping is...wait for it...$12 USD. WTF. I am not buying it. A set of Aristo Heavywieghts.. best price I found, $900 USD. Shipping...$700USD. This HAS to be looked at from the MTH angle to even compete with the makers entrenched in Europe. Also you would have to ask oneself , how many in the State's alone model Euro outline in 1:32. Not to many. (IMHO). Aristocraft tried to compete in the Euro market with a British outline Dismal and to really wonder what the hell they were thinking, tried it with a 1:29 scale model in a market where, Scale to Gauge is almost sacred. (Look at the live steam market, if it isn't 1:32 or 1,20.3 scale, almost will not sell)
And she did that unassisted with 143 Double Stacks at a steady 35 MPH. One thing I really would like to know about this fella is, Just how did he get his job and why have the alarm bells not gone off sooner? That sort of crap with tooling and such would sure as hell get questions being asked at Steamrail Victoria.
Unfortunately not Jens, However I know a fella here in Victoria that made the body for one from 2 USA trains F3 units. A bit of slice and a lot of dice but he did the body. Then ran into trouble with the trucks/ bogies. The Victorian B and S class diesels both ran 3 axle Commonwealth trucks / bogies. This made them 1-A-1 units and had a lot to do with axle loading in the day. I never found out if he finished it but these units are available in O and HO scale from Ausiscion. As an aside the S class is a bit of a odd fish as well because though it looks like a E8 - 9 it is shorter, but longer than a F3. Two of these were written of in a horrific train smash at a place called Violet Town involving the Southern Aurora Passenger Train. If any one wants to know about the paint scheme on the Loco's and the Passenger cars in the above photo I can tell you but I would do so in another thread. Quite a story in and of itself.
These were made by Clyde under license from EMD in Granville Sydney in 1952 for Victorian Railways. Only bulldog nose double ended diesels in the world. Some of them are still operating as rebuilt units except for this one which was restored to original condition as is the S class behind it. (Single ended)
Open it up and use a hairdryer on low setting to blow warm air into it and dry it out completely. Used to do that on PC boards after a lot of soldering and then wash down with soapy water. Just make sure it is dry.
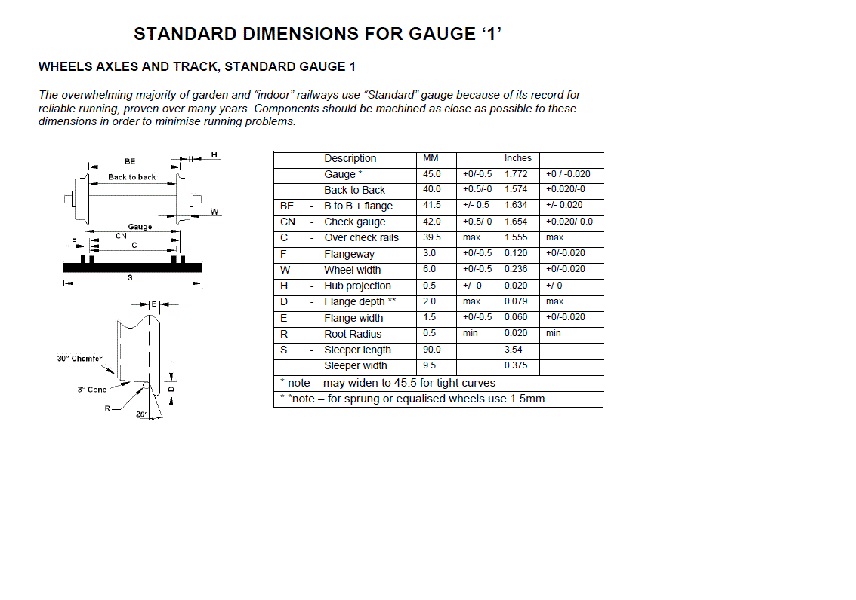
I found the standards implemented by NMRA as quite acceptable and had / have no problem with them at all. Would have been nice though if they had not made their chart so damn complicated to read for the un-initiated. As for the subtle variations , I believe TOC called that " the NMRA fudge factor" . It is with some interest that I think MTH moved to the Hi- rail standard not long after it was implemented. Why I say that is because their early offerings would not run on code 125 rail without the flanges hitting the spikes, aka my Challenger, but their later stuff does not appear to do so, as reported elsewhere in this fora. USA trains I cannot comment on except to say my 2 GP 38's will not run well on 125 code rail. Hit the spikes. These are old units though. Aristo? No good flogging a dead horse so leave that alone now. Why I mentioned new moves were afoot was reported by Greg E. (who had Polk's ear for a while) and he stated that NEM MOROP standards were being looked at for adoption by the NMRA for anything running on 1.772" gauge track. Those standards to me meant that some of the problems would disappear with a certain manufacturer but would create a slew of other problems for older made gear already out there. So a question then arises. Do we need that?
Jerry. I reckon a bit of a how to article on these would not go astray on here, and also be appreciated. Such as trucks used, what wheels, how you mounted the kaddee's., Source of the New Bright cars or do you think the Lionel units would substitute? You know, just the minor details. hehehe Grant
Live in Melbourne Victoria. As I post this it is Tuesday Morning at 04:05. Your tomorrow. By the way it is looking sunny with temps in the mid teens C.
Joe. My Challenger when I got it had issues with gauge with the lead and trailing truck and all of the axles on the tender. All were under gauge. Reset and no problem since but use care when resetting them. If I recall right, they were fairly tight on the axles so take them right out of the loco before doing it and the tender as well. The drivers however were ,from memory pretty good, so I left them alone. Then check the clearence's on the switches using the chart above. There is a ton of info around on how to fix them if needed. One of the reasons I started making switches for myself which grew into Outback Turnouts was the issues with the major's turnouts and the fact I DON'T like set track turnouts. A review of that Challenger can be found here at this link http://www.largescalecentral.com/forums/topic/5312/mth-challenger-review http://www.largescalecentral.com/forums/topic/5311/mth-challenger-review-part-2
These are what I use in the manufacture of Outback Turnouts. Note that there is no - on the back to back setting only +20 thou. I set my Back to Back to 1.575, Works for me.
Joe , Don't give up on making your own turnouts. Took me a year to get Outback Turnouts to the point that they could be sold without any problems and then I just kept on improving them. Biggest turnout I have ever made was a #15. Still got it and no it is not for sale. Almost need a small layout area to use it hehehe. Make yourself a tie jig to start with. It will help you greatly.


Planning new frieght yard
in Track & Layout
Posted · Edited by Grant-Kerr
Insert text
Thank you Chuck. Interesting that you picked up on the wye, So here is how it goes. A #10 of the main into a #5 wye, This brings the second track parallel with the main and the added effect of bringing the #6 units into play of the other angle. Track centre's are 7" from the main to track 2 and then 5 1/4 inches on all the rest of the tracks. The holding tracks are #7 turnouts that had been made for a client a couple of years ago (2 L/H and 2 R/H) who did not show up, I have been looking at them for ages wondering where I could use them and this is it.") They are also 5 1/4" spacing. Total track bed width is 40 1/4 inches on the base, Quite workable. As to length, well the side of the house we never use has a garden bed in it with a concrete walkway between it and the house. SWMBO has okayed the use of this for this project then it is going to be a LOT of honey do's for the rest of the layout. (Can read that one like a book! ) Like Joe's layout it will run the boundries so should be ok. I hope.
They are also 5 1/4" spacing. Total track bed width is 40 1/4 inches on the base, Quite workable. As to length, well the side of the house we never use has a garden bed in it with a concrete walkway between it and the house. SWMBO has okayed the use of this for this project then it is going to be a LOT of honey do's for the rest of the layout. (Can read that one like a book! ) Like Joe's layout it will run the boundries so should be ok. I hope.