todsmods Posted September 13, 2016 Share Posted September 13, 2016 Hi guys i have now started this project a 1/32 scale Victorian Railways B class locomotive . I have started on the 3 axle trucks and laser cut side frames. I dug around in my spares box and found 2 lionel G scale motor trucks . They were too short for the locomotive so i cut them in half and lengthen them and added a 3rd center dummy axle so it will be powered A1A +A1A . Ill be using battery power and rc and will have 4 motors to drive her along. Here are some pics of th3 cut and lengthened trucks and the laser cut side frame parts. Quote Link to comment Share on other sites More sharing options...
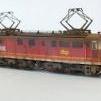
todsmods Posted September 13, 2016 Author Share Posted September 13, 2016 O here is a photo of the locomotive Quote Link to comment Share on other sites More sharing options...
Rayman4449 Posted September 13, 2016 Share Posted September 13, 2016 I look forward to watching this one come together Quote Link to comment Share on other sites More sharing options...
Jerry B44 Posted September 13, 2016 Share Posted September 13, 2016 I will follow this. I have two of those Lionel trucks. Looks interesting. I used two E-8 noses one time and one USA 3 axle truck on it for a build, just for grins. Quote Link to comment Share on other sites More sharing options...
todsmods Posted September 13, 2016 Author Share Posted September 13, 2016 I have aquired 2 1/32 scale E8 cabs also for the build. Quote Link to comment Share on other sites More sharing options...
todsmods Posted September 16, 2016 Author Share Posted September 16, 2016 Started chassis plate and test fitted cabs now Quote Link to comment Share on other sites More sharing options...
Jerry B44 Posted September 16, 2016 Share Posted September 16, 2016 His castings look great. How are you mounting the motors to the frame? Quote Link to comment Share on other sites More sharing options...
todsmods Posted September 16, 2016 Author Share Posted September 16, 2016 Hi jerry just going to use a simple bolt fixed in tbe the center of each motor truck and a hole in the locomotive floor Quote Link to comment Share on other sites More sharing options...
Jerry B44 Posted September 17, 2016 Share Posted September 17, 2016 Post a pix of the truck with bolt, if you would, when you do it. Quote Link to comment Share on other sites More sharing options...
rbrown7713 Posted September 19, 2016 Share Posted September 19, 2016 HI Tod. I sent the windshield frames, sorry about the bubbles, almost impossible to pour without bubbles, but they can be repaired and allow about two weeks for delivery. Also, the glass for the sides might be different than you want to use, but there is extra plastic to use for your installation. Here is a picture on how I do it, provides a little ventilation too. Bob. Quote Link to comment Share on other sites More sharing options...
todsmods Posted September 20, 2016 Author Share Posted September 20, 2016 Laser cut locomotive body sides today and test fitted them. Quote Link to comment Share on other sites More sharing options...
todsmods Posted October 18, 2016 Author Share Posted October 18, 2016 Loco sides now glued in position electronics fitted now time to start drawing up parts to laser cut for the locomotives roof and need to find something that will work for the roof mounted radiator fans Quote Link to comment Share on other sites More sharing options...
todsmods Posted October 18, 2016 Author Share Posted October 18, 2016 This is my favorite tool in my workshop my 60 watt co2 laser Quote Link to comment Share on other sites More sharing options...
todsmods Posted October 18, 2016 Author Share Posted October 18, 2016 Also cuts 1/4 in MDF well my wife takes my laser near Christmas to make Christmas decorations like these Quote Link to comment Share on other sites More sharing options...
rbrown7713 Posted October 18, 2016 Share Posted October 18, 2016 Beautiful work Tod, except, I can't tell whether that loco is coming or going. What about the fans? Are they like F7 fans? Post a picture. Bob. Quote Link to comment Share on other sites More sharing options...
todsmods Posted October 18, 2016 Author Share Posted October 18, 2016 Yes the same fans i only need one as ill use some sillercone moulding putty to make duplicates i need 6 in total and am thinking about fitting 6 tiny working fans in them like computer ones Quote Link to comment Share on other sites More sharing options...
todsmods Posted October 18, 2016 Author Share Posted October 18, 2016 Hey bob have you used the sillercone moulding putty ? Great stuff Quote Link to comment Share on other sites More sharing options...
Jerry B44 Posted October 18, 2016 Share Posted October 18, 2016 What size/shape fans do you need? I have some Great Trains ones, some in metal, some big ones cast in the roof. Quote Link to comment Share on other sites More sharing options...
todsmods Posted October 20, 2016 Author Share Posted October 20, 2016 Any F3 or f7 fans will do guys Quote Link to comment Share on other sites More sharing options...
rbrown7713 Posted October 20, 2016 Share Posted October 20, 2016 I have one for you to copy, I just have to find it and I will send it to you. Bob. Quote Link to comment Share on other sites More sharing options...
rbrown7713 Posted October 20, 2016 Share Posted October 20, 2016 Tod, let me know if you have found the fans, If you haven't, let me know and I will make you a mold, I won't take the time if you have found some, let me know, I couldn't find my fans, so I will copy the MTH fan and shroud. Bob. Quote Link to comment Share on other sites More sharing options...
rbrown7713 Posted October 20, 2016 Share Posted October 20, 2016 OK Tod, I have made the pattern for the first part of the mold, and here it is. I am waiting for some more urethane, about 3 days and I will finish the mold. Bob. Quote Link to comment Share on other sites More sharing options...
todsmods Posted October 20, 2016 Author Share Posted October 20, 2016 Hi bob thanks so much those fans look terific the locomotive has 6 roof mounted fans . Let me know what i owe you for them. Quote Link to comment Share on other sites More sharing options...
rbrown7713 Posted October 21, 2016 Share Posted October 21, 2016 You don't owe me anything Tod, just paying back for some of things that were given to me in the forum, Bob. Quote Link to comment Share on other sites More sharing options...
rbrown7713 Posted October 30, 2016 Share Posted October 30, 2016 Tod, I finished the mold and made two parts. The picture shows that the dome on the fan shroud has a large bubble. That is caused by the top mold, when put on the bottom mold, automatically has air in it, so when the plastic is displaced when the top mold section is put on top, the air is caught in the top mold. I haven't corrected that because I will leave that to you. There are several ways to overcome that inherent problem. The first would be to drill a hole in the top mold so that there is somewhere for the plastic to go. Then you would have to grind and shape the dome of the shroud. Another way would be to pre fill the top part of the mold with slightly setup plastic and then turn it over and place it on the lower mold. Then there wouldn't be any air caught. Maybe over fill the bottom part with plastic and when you put the top part on it, bend the top part of the mold and roll it on the bottom part. Maybe you can come up with another way, I will leave that up to you. I will be sending the mold out tomorrow, Bob. Quote Link to comment Share on other sites More sharing options...
Recommended Posts
Join the conversation
You can post now and register later. If you have an account, sign in now to post with your account.